March 20, 2013

Lemonhead Cookies

We have a grocery store here in Midway called (get this) The Store.  I won't go into all the details of the confusion the name can cause, but they do sell these amazing cookies.  They're Ruby Snap cookies.  


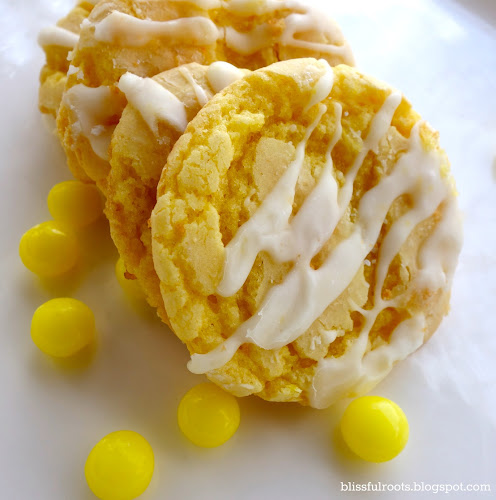
My husband got several of the cookies for his birthday one year, and fell in love with the lemon one.  He came home and  told me all about the cookie.  He was convinced I could try to recreate it with my lemon cake cookie recipe.  The secret was to add crushed Lemonheads to the recipe.    


I followed my husband's instructions, and made the cookies.  I also added a lemon glaze on top (you can never have too much lemon).  I was quite impressed with the results!  Not the original Ruby Snap cookie, but a new cookie in and of itself.  All thanks to my husband!  


The crushed Lemonheads add the perfect zing and chewy, crunchiness.  My only complaint about them is how terrible they stick to the pan.  I've tried spraying the pan between every batch, but it doesn't seem to help.  I don't own one, but maybe a Silpat would work.  I have found that if I get the cookies off of the baking sheet as quickly as I can,  then the Lemonheads don't have time to harden, and they come off easier.  


The recipe is really simple.  I got the basic cake cookie recipe from my cousin before I was even married.  You can use any flavor of cake mix, but for this recipe we're using lemon (obviously).


I put in 1/2  cup of crushed Lemonheads, but you can adjust it to your liking.  I'm pretty sure you wouldn't want less, but the more the merrier!  
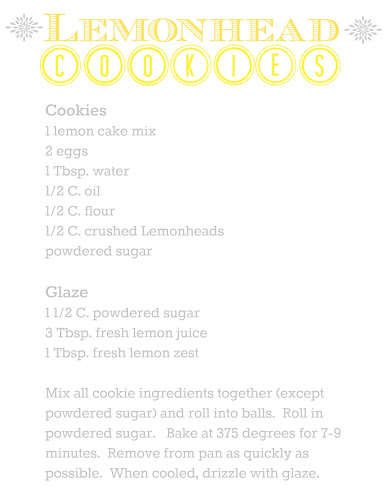
Click here to print your recipe.
Thanks so much for stopping by!  I hope you found a little something worth your time.

Linking up to these parties & Savvy Southern Style.
Pin It

March 19, 2013

Printable Chalkboard Egg Hunt Sign

I found some amazing chalkboard backgrounds at Lilac and Lavender a few weeks ago, and have been having lots of fun playing around with them.  I really liked this large size, but there were also smaller sizes for tags or labels.


Now that St. Patrick's Day is over, I can focus on Easter.  I kind of have a hard time with holidays sharing a month.  Anyone else feel that way?  I like one a month so I can enjoy it and get everything done that I'd like to for each holiday.   

Anyway, I decided to make an egg hunt printable for today.  I was going to get this printed out in a large size to show, but we have family visiting from Arkansas this week, so I didn't quite get around to it.  You could print it out large to put outside on a wooden stake for your egg hunt this year, or just print it out as is (or smaller) to use for inside decor. 
Anyway you use it, I hope you enjoy it! You can click here to print yours.

Thanks so much for stopping by!  I hope you found a little something worth your time.

Linking up to these parties & Savvy Southern Style.
Pin It

March 18, 2013

Glittered Chocolate Bunny

A few Easters ago I ran across this video from Martha Stewart.  She was making glittered bunnies and cabbage baskets for Easter.  


I instantly fell in love with the glittered bunnies, and wanted to try to make some.  I didn't, however, want to pay $12 for a ceramic bunny (like the lady in the video did) to paint over and glitter.  Lucky for me, someone smarter than me left a comment on Martha's site that said she had tried this idea with a chocolate bunny.  Brilliant!  The next day, I was on a mad hunt for chocolate bunnies, but I couldn't find any that I liked.  Ahhh!!  Needless to say, Easter came and went that year, and my glittered bunnies didn't get made.


Fast forward a couple of years.  I was at Smith's a few weeks ago (not even looking for chocolate bunnies), and there in the Easter section for $1 was the perfect chocolate bunny! 


I love the simple, classic shape and style of the bunny.  I even like him as is- chocolate brown.  He could easily work just like this.  In the Martha Stewart video, she had a bunch of  brown bunnies in the background, and I love how they looked!


This is about as simple as it gets.  I used cream-colored craft paint for my base.  A pale yellow, pink, green, or blue would be really pretty as well.  I painted the bunny, let it dry, and then sprayed the painted bunny with spray adhesive.  I then sprinkled the glitter all over the bunny, and shook off the excess.  That's it.  Honestly, this could not have been any easier, and it turned out absolutely amazing!  It's one of those projects that will turn out even a bit better than you'd hoped for.


This is what I used for my glitter.  I've had it for ages, and never really used it until this winter when I needed some glitter for my winter ornaments.  I wasn't sure what to expect because it is meant for embossing with stamps, but it totally delivered!  I really like how this works.  It's fine, glittery, iridescent, and a bit transparent.  


The picture doesn't do the glitter justice.  It's gorgeous!
I made this bunny over two weeks ago, and it's still holding up.  I was a bit worried about painting chocolate, and then spraying it, and glittering it, but the chocolate seems completely unaffected.  It will easily last until Easter, and I might even try storing it carefully for next year (we'll see what state it's in then).

As you saw in the picture above, I put my bunny in a cute frame (from Micahaels) with scrapbook paper behind it.  I also love what Martha Stewart did with her bunnies.  The chocolate bunnies wouldn't hold the flower like Martha's, but they would stand up if glued to a base of some kind.  They would look adorable on an Easter table, or anywhere else.  If you make some bunnies, I'd love to hear how you used them in your Easter decor.

Thanks so much for stopping by!  I hope you found a little something worth your time.

Linking up to these parties & Savvy Southern Style.
Pin It

March 15, 2013

Have To Do, Should Do, Want To Do List

Are you a list person?  I would have to say, "100% yes!" to that question .  I make lists for just about everything I do.  Several years ago, during a lesson at church, I learned a great way to prioritize my day by making a simple list.  The list looks something like this.


The idea is to prioritize your day into things you have to do, should do, and want to to.

That lesson in church was over three years ago, and I still use this system today.  I put three items under each heading.  Three is a doable number for me (you may want more or less).  I fill out my list every night before I go to bed for the next day.  I like waking up and knowing what I have to do, should do, and want to do.  


My 'Have To Do' list is usually made up of tasks like, be mom, cook meals, get boys to school.  Really when I look at my day, there aren't a ton of things I have to do.  Appointments, assignments, and deadlines (when I have them) definitely go under the 'Have To Do' list for the day.


My 'Should Do' list is the list that could be miles and miles long.  These are things like cleaning, organizing, laundry, writing a letter to a friend, yard work, exercise.... you get the idea.  I like having three things a day that I should do.  Once again, three is really doable for me.  I'm not completely overwhelmed with a mile long list- just three things.  And isn't it amazing how writing something down helps you actually get it done? 


My 'Want To Do' list is often the list I don't get around to.  I do however, always move whatever I didn't get done in the day to the next day.  Sometimes an item on my 'Want To Do' list gets bumped to the next day for five days in a row, but I leave it there until I get around to it.  I like the 'Want To Do' list because it helps me remember to take time in the day for myself.  I need it- we all need it!

Do you organize your days, if so what are your trick?  I'm always looking for new ways to use my time more wisely.

Thanks so much for stopping by!  I hope you found a little something worth your time.  Oh, and if you've like to print my version of the list, just click here

Here's another BTW for you.  We read this quote in our lesson at church that I talked about, and I LOVE it!  Just thought I'd share it with you.

"Time is all the capital stock there is on the earth;...if properly used, it brings that which will add to your comfort, convenience, and satisfaction.  
Let us consider this, and no longer sit with hands folded, wasting time."
-Discourses of Brigham Young, sel. John A. Widtsoe

Linking up to these parties & Savvy Southern Style.
Pin It

March 14, 2013

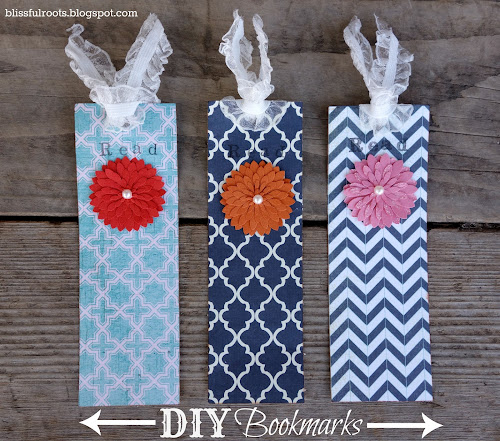
DIY Bookmarks

Are you a reader?  I would say I'm a bit of a forced reader.  I love reading, I taught reading to first graders for five years, I read constantly to my little boys, but when it comes time for me to read something for myself, I have to almost force myself to do it.  I have been trying to set aside a few minutes before bedtime to read.  It's been so nice, and I'm wondering why I don't do it more often. 


 I also enjoy reading more when I have a cute bookmark to use.  I'm the same way with writing.  I'll do it a lot more often when I have a cute notebook and pen.


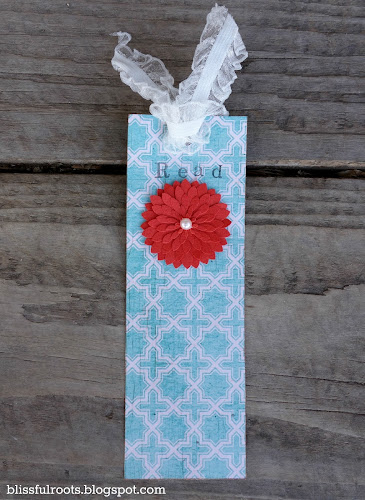
These bookmarks were made with some scrapbook paper I had on hand.  This is the perfect scrap paper project, and they're really easy!  (BTW, I cut my scraps to measure 2"x 6" for my bookmarks.)  


Don't they look so cute poking out of the top of the book?  Speaking of cute bookmarks, check out Sarah's cute pom pom bookmarks over at Alderberry Hill.   I'm going to have to make some of those next.


I like to use an elastic ribbon for the top because it will stand up and not just flop to the side or back.


All the flowers on my bookmarks came from Martha Stewart.  I found them in the sticker section at Michaels.  I attached the little pearls in the middle of the flowers with hot glue.  I found them at Walmart, also in the sticker section. 


I stamped the word 'Read' on the bookmark with my alphabet stamp set (it's a bit hard to see on this navy blue one).  You could print right on your bookmark, or write it yourself if you don't have a stamp set.

I also Mod Podged the front and back of my bookmark before I  punched the hole, added the ribbon, or attached the flower.  It helps the bookmark be a bit more durable.  For more details on the how to of these bookmarks, you can click here

By the way, right now I'm reading Sarah's Quilt by Nancy E. Turner.  It's the second in a series of three.  I've really enjoyed this series so far, and would highly recommend them!

Thanks so much for stopping by!   I hope you found a little something worth your time. 

Linking up to these parties & Savvy Southern Style.
Pin It

March 13, 2013

Ambrosia Salad

Several years ago, a group of ladies at my church put together a recipe book of just salads.  It's maybe 12 pages long and just stapled together paper, but I LOVE it!  It's my go-to recipe book when I need a good salad/side dish.

Easy Ambrosia Salad {5 Ingredients, 1 Cup of Each} from Blissful Roots

Have you ever heard of ambrosia salad?  You probably have eaten it even if you don't recognize the name.  My mom used to make this when I was young, and it's the recipe I contributed to the little cookbook we made.  The thing I love about this recipe is that it has 5 ingredients, and 1 cup of everything.  Easy ingredients, and you practically have the recipe memorized after making it just once.  You can't beat that!
Here's the recipe.


There are lots of versions of ambrosia salad out there, this one is very simple and easy.  Like the recipe states, you can always experiment and add whatever else you'd like (nuts, maraschino cherries, bananas, apples,grapes, the sky's the limit).  The recipe doesn't make a ton, so unless I'm just feeding my own family (husband and three boys) I usually double it.  
I've also tried substituting the sour cream for Cool Whip, and it's yummy. I actually like the sour cream better, but in a pinch Cool Whip works great.  The salad just turns out a bit sweeter than the original version.  
You can click here for the recipe.
Thanks so much for stopping by!  I hope you found a little something worth your time.

Linking up to these parties & Savvy Southern Style.

Pin It

March 12, 2013

Another Irish Blessing Printable

I wasn't going to do another Irish blessing printable today because I just did one last week, but then I thought this is the only time of year I'll do these, so I might as well get them in while I can.  


And in case you missed last week's Irish blessing printable, here it is. 


I hope you enjoy these printables.  Simply click on each image to print them out.

  Are you ready for St. Patrick's Day?  We had our little leprechaun visit again tonight.  He left Harry Potter Bertie Bott's (we're reading the books together- we're almost done with #4).  My boys thought they were the coolest thing ever!  However, the vomit flavored bean held true to it's name.  One of my twins may or may not have had a very strong reflux reaction to it.  We made it to the bathroom just in time, I'm glad to say.  They thought that part was even cooler than the unusual names and flavors of the beans.  I really never have a dull moment with my three boys around!  We'll see what our little leprechaun does or leaves tomorrow.
Thanks so much for visiting!  I hope you found a little something worth your time.

Linking up to these parties & Savvy Southern Style.
Pin It