September 28, 2013

DIY Wood Plank Sign {You Are My Sunshine}

You're probably sick and tired of hearing about my son's gallery wall I've been attempting to put together.  But I think I'm finally making some headway.  I'll share as soon as it's complete, but here's what I just finished to add to the wall.


DIY Wood Planked Sign {You Are My Sunshine} @ Blissful Roots

My in-law's bought some really cute wooden signs at Swiss Days this year, and they looked so simple to make.  I've been wanting to make something like this for a long time, so I was glad for the inspiration to finally do it.

My father-in-law has a big wood pile in his field, so whenever I need some good, old barn wood I head to that pile.  I found some pieces and had my husband cut them for me.  Each plank is approximately 4" x 16".  Then, he attached a few small wood strips on the back to connect the planks.  Click here for a video clip from Studio 5 (a local lifestyle show here in Utah) that uses the same method I did to attach my planks.

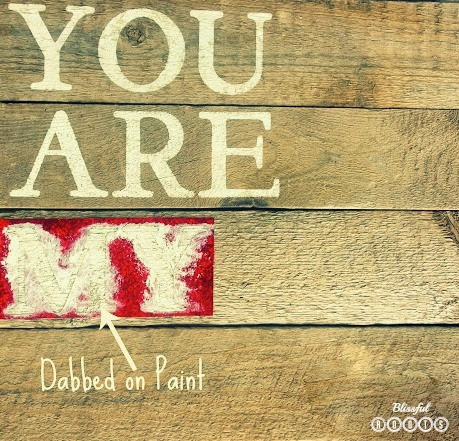
I used my Cricut to cut out my lettering in vinyl (like my shiny red vinyl?  I'm not even sure why I bought this, but it came in handy for this project).  I used the Classic Font Cartridge for the letters.  

DIY Wood Planked Sign {You Are My Sunshine} @ Blissful Roots

DIY Wood Planked Sign {You Are My Sunshine} @ Blissful Roots

LETTERING
YOU ARE MY (3" capital letters with cream paint)
sunshine (2" lowercase letters with yellow paint)

Just like I stated with my Bug Jar Caddy, I've learned to use as little paint as possible on my brush when using the vinyl as a stencil on wood, and just dab the paint on. I don't use any brushing motions at all.  You probably have your own method, so do whatever works best for you.  This is what I've found helpful.  I also peel off my vinyl immediately after I've painted.  I don't let it dry first.

The little sunshine I used for the dot on my 'i' came from PicMonkey.  I found it in Overlays.  It was actually in the Stars category, but it looks like a sun to me.  I printed it out in yellow, cut it out, and then used Mod Podge to adhere the gold glitter.

DIY Wood Planked Sign {You Are My Sunshine} @ Blissful Roots

I was pleasantly surprised with how this turned out.  If you're like me, often times you have a great idea in your head, but the end product doesn't quite reach your expectations.  Well, not in this case.  I love everything about this sign, especially the rustic, simple feel, and the bit of pop the glittered sunshine provides.  It was so easy to make, and it didn't cost me a dime- even better!  Now I need to make some more signs.  I'm thinking a Halloween one would be fun!


Thanks so much for stopping by!  I hope you found a little something worth your time.

Linking up to these parties & Savvy Southern Style.
 photo Signature4_zps147dea12.jpg
Pin It

September 27, 2013

Dollar Store Cookie Halloween Ornaments {@ twelveOeight}

Today I'm over with Tanya at twelveOeight.  I'm so excited to be sharing a bit of her space!  Tanya is so sweet, and I love everything she has to share on her blog.  Go check her out.

I'm not even trying to put off the Halloween decor anymore, it's close enough, isn't it?  I have some super easy, super inexpensive (8 for $1!) Halloween ornaments to share over at twelveOeight. I used the same dollar store cookies I used on my Christmas ornaments.  Stop by for all the details and a free printable of the labels I used.  

Dollar Store Cookie Halloween Ornaments From Blissful Roots

Click here to see the entire post.
Thanks so much for stopping by!  I hope you found a little something worth your time.

Linking up to these parties & Savvy Southern Style.
 photo Signature4_zps147dea12.jpg
Pin It

September 26, 2013

Tissue Paper Apple Art Project

Do you remember making the tissue paper art projects in elementary school?  I remember loving any kind of art project when I was younger.  My absolute favorite was making balloon characters for every holiday in first grade (thank you, Mrs. Simmons).  So many fun memories.


Tissue Paper Apple Art Project For Kids @ Blissful Roots

It's fun having my boys do some of the projects I used to do.  My boys love this project because they get to dip the tissue paper squares in glue.  It's a messy project, but I love how the end product always turns out.  

My three-year-old did this tissue paper apple at the beginning of the month.  I love displaying my boys' artwork when it's done.  It's a lot like my post on The Magic of Mason Jars and Labels.  It's all in how you display it.  The apple itself is cute, but you add a background and some stamped lettering, and it gives your child's art project an extra special finishing touch that looks great on the wall.

BTW, if you're not familiar with this tissue paper art method, Snapshots has a great tutorial.
Thanks so much for stopping by!  I hope you found a little something worth your time.

Linking up to these parties & Savvy Southern Style.

 photo Signature4_zps147dea12.jpg
Pin It

September 25, 2013

Zucchini Spice Cupcakes W/ Cinnamon Nutmeg Frosting

Did you know there is an actual 'Sneak A Zucchini Onto Your Neighbor's Porch' Day?  There is, really.  Actually, when you get looking there's a day for just about everything.  Well, I know we're way past August 8th, but if you're like us, you still have plenty of zucchini to go around.  This recipe is one of my favorite ways to use up shredded zucchini.  The spice cake, chocolate chips, and frosting are perfection together!

Zucchini Spice Cupcakes W/ Cinnamon Nutmeg  Frosting @ Blissful Roots

My sister gave me this recipe, and she got it from my grandma.  My grandma is allergic to eggs, so she always uses just one egg in the recipe (it calls for 3).  I've use one and two, but never three.  The cupcakes seem to be just fine with fewer eggs.  I also like to use semi sweet chocolate chips in this recipe.  I actually almost always use semi sweet chocolate chips these days.  I love the intensity of their flavor.  You can also make your own vanilla frosting instead of using the store-bought kind.
Click to Print

Hopefully today's recipe will help you get rid of a few more zucchinis, or you can keep sneaking them on to your neighbor's porch. :)

Thanks so much for stopping by!  I hope you found a little something worth your time.

Linking up to these parties & Savvy Southern Style.


 photo Signature4_zps147dea12.jpg
Pin It

September 24, 2013

Fall Printable

PicMonkey pulled through for me once again.  I was getting my printable put together for today, and was wishing I had some fall overlays I could use. Well, lucky for me, PicMonkey just added some leaf and tree overlays.  Happy day!  I'm really excited with how it turned out.  I couldn't decide on which colors to use, so there are two options today.

Click to Print

Click to Print
I'm really stuck on grey these days, but I wanted a touch of fall colors as well.  Every time I make a printable I think of what I'd actually put up in my home.  I hope the colors I tend to lean toward suit some of your likes as well. 

Thanks so much for stopping by!  I hope you found a little something worth your time.

Linking up to these parties & Savvy Southern Style.

P.S.  I had a smart comment from a reader who noticed what looks like a misspelled word.  This saying is from the 1880s.  It comes from an old children's song.  I usually would spell o're this way- o'er (since over is spelled with an 'er', not 're'), but I wanted to stay true to the song, so I left it.  I hope it doesn't bother too many of you.  Thanks!

 photo Signature4_zps147dea12.jpg
Pin It

September 23, 2013

Recycled Cardboard Turned Into Canvases

A couple of weeks ago, I mentioned the gallery wall I've been attempting to create next to my three-year-old's bed.  Well, I'm still at a bit of a stand-still, but I haven't had much time to work on it.

Recycled Cardboard Turned Into Canvases @ Blissful Roots

Anyway, as I was looking for things to use on the wall,  I found this vintage ABC scrapbook paper and fell in love with it.  I guess it's the teacher in me, but I have a hard time passing up anything alphabet-related.  I wanted it on the wall, but wasn't sure how to use it.  Well, I'd bought the cutest clock at Ross for $8 (such a deal!!), and as I was about to throw away the clock packaging, I noticed the color and shape of the cardboard it came in.  It was square, yellow, and the perfect size!  I put a fun striped paper behind the ABC paper, and then mounted it on the cardboard.  Presto!  An instant canvas for nothing!!!

Recycled Cardboard Turned Into Canvases @ Blissful Roots


Here's a better shot of what the cardboard box looks like.  I love how it is light-weight, and adds dimension to the ABC artwork.  

After my discovery, I got looking around and found all sorts of cardboard lids and boxes that could be used as a canvas.  If you have any old puzzle boxes, game boxes, shoe boxes, food boxes, whatever kind of box or lid you can find lying around, don't get rid of them, at least without taking a second glance at them.  You might have to paint the box or lid, and the shapes and sizes will vary, but you there's a lot of possibilities in them.

Recycled Cardboard Turned Into Canvases @ Blissful Roots

I'm so excited with how this turned out!   My only problem now is getting it to work on the wall.  I did put up another ABC (once again, my alphabet addiction) canvas above his bed, so I don't know if I'll really need this one on his gallery wall, but I'll find somewhere for it.

Thanks so much for stopping by!  I hope you found a little something worth your time.

Linking up to these parties & Savvy Southern Style.

 photo Signature4_zps147dea12.jpg
Pin It

September 20, 2013

My New Old iPhone

I'm not too techie.  My husband is all techie!  He's been researching and making spreadsheets (that's not a lie) for the past few weeks.  He's looking to get the new iPhone 5s, and we're looking at switching providers.  It kills him to not get the best possible deal out there. 

Source

Anyway, for the first time in my life, I will own an iPhone.  My husband's old phone will be my new iPhone.   I'm quite excited!  I do wish it was white, not black, but other than that I have no complaints.

I'm most excited about the camera.  I haven't been on Instagram before, and I miss a lot of photo opportunities with my boys because I don't have a camera on me.  I can't wait to get some fun photo apps, and go to town. 
So, what's your favorite thing about your iPhone? 

Thanks so much for stopping by!  I hope you found a little something worth your time. 

Have a fantastic weekend!  
 photo Signature4_zps147dea12.jpg
Pin It

September 19, 2013

The Magic of Mason Jars & Labels {Displaying Collections}

As a mother of collecting little boys, I've discovered there's magic in a Mason jar (or any jar, really) and a cute label (thank you, PicMonkey!).  

The Magic of Mason Jars & Labels {Displaying Collections} @ Blissful Roots

Have you ever checked your boy's pockets at the end of the day?  Well, if you're like me you don't actually check the pockets every day, but you find plenty of "treasures" in the washer.  I'm constantly amazed with what my boys find.  They see things I never see, and they're pro at sliding their finds into their pockets without me noticing anything. 

 A few summers ago I did a Ragnar race.  I was leg 12 which meant I crossed the finish line for my team.  My family was there to watch.  On our way back to the car, one of my twins found a can of chew in the parking lot.  As many times before, I hadn't even see it, or noticed him pick it up and tuck it safely into his pocket.  Later that evening he proudly showed me he latest find.  I explained to him what it was, and luckily that was enough to convinced him trash it.  

Not only do they have collections of things they find, but there are legitimate toys that tend to collect in piles here, there, and everywhere as well.  Their nightstands and dressers were becoming collection mountains.  Do you have piles of these things around your house? 


And that's just the tip of the iceberg!  The piles and varieties are endless.  Rocks, sticks, acorns, pine cones, stickers, beads, seashells, and on and on.

  Well, a few weekends ago, I'd had it!  As much as I don't understand most of their piles and collections, I feel like I do need to let them know that if it's important to them, it's important to me.  The solution?  Keep their treasures and collections (well, a reasonable number of them), but display them in style.  I've always loved the classic look of a glass jar. Add a cute, simple label to the jar, and you've got little boy's (or girl's) treasures that can even act as decor.  It's all in how it's displayed.
Problem solved!


As I mentioned above, I love, love, love PicMonkey!  I've discovered the endless possibilities to making cute labels with what they have to offer.  You can see a few of the labels I've made in PicMonkey by clicking here and here.
What are your tricks for keeping your kid's collections under control?

Thanks so much for stopping by!  I hope you found a little something worth your time.

Linking up to these parties & Savvy Southern Style.

 photo Signature4_zps147dea12.jpg
Pin It